Although a Revit file can be a complete site, I HIGHLY RECOMMEND teams model the SITE separately from the BUILDING.
Here’s why:
1) Buildings are modeled in PROJECT NORTH by default. This makes for more accurate models/data, and supports the majority of the documentation layout.
2) SITES are often created directly from CAD/Civil documents, which are generally TRUE NORTH. Separate SITE and BLDG files make this easier to manage.
3) A separate BLDG allows various siting/positioning studies to be easily and quickly performed, to evaluate daylighting and sunshadows. It is VERY difficult and messy to attempt this when the file is all together as one.
4) Processing for larger site projects is much more efficient with separate SITE and BLDG models, using worksets and unloading the linked file when not being focused on.
Setting up the files:
 IMPORTANT: The Project Base Point is Revit’s “ORIGIN” – this cannot be changed. If you want the Revit origin to be located elsewhere in the future, the MODEL must be moved around this stationary point. Due to all the inherent vertical workplane relationships within the model, picking it up and moving it can be VERY MESSY and time consuming, and can break a lot of the model. A thoughtful decision about where to begin modeling relative to this fixed-origin is extremely important!
TO USE THE CAD ORIGIN (OR NOT):
IF the Civil/CAD resource for the site has a workable origin (locating the final project extents wholly within a 20′ diameter area) the CAD file can be linked in ORIGIN-to-ORIGIN to keep those points the same. NOTE: This does not resolve the rotational difference between PROJECT and TRUE North, which must still be manually set initially.
If the CAD origin does NOT work for direct use in Revit, I recommend the team select a VISUAL/KNOWN POINT (Property Line, or other easily referenced and static point). Link the CAD file in CENTER-to-CENTER (which Revit will default to, if the ORIGIN-to-ORIGIN is not viable), and MANUALLY move the CAD link to position the desired Reference Point to the Revit Project Base Point. Once positioned, PIN the CAD file to prevent accidental moving.
NOTE: selecting a visual point is recommended to facilitate exporting DWG backgrounds, and having a visual marker to assist with coordinating positioning across files without a shared origin.
STARTING WITHOUT A CIVIL BACKGROUND:
Often, a design team does not have any site/civil resources before beginning preliminary design. (Again, this is a strong reason for modeling the BLDG separate from the SITE).
In this case, start the BLDG file first, and model around the Revit Project Base Point, setting it to be a VISUAL/KNOWN POINT (Property Line, or corner of (E) building, or at the very least, the intersection of primary grids (A & 1). DO NOT leave the Base Point position to be arbitrary! This would become a real pain in the future, believe me.
COORDINATING WITH CAD ORIGIN:
This applies when the Revit model has not been able to coordinate to a CAD origin BEFORE developing the model. While this process is not required, it does make for much more convenient exports of CAD backgrounds from the Revit model that a consultant can xref in ‘Origin-to-Origin’ and not have to manually position things.
The prep work:
a) Create a line in the CAD file from 0,0,0 to a visually identifiable point (in this example, it is to the corner of an existing building footprint in the CAD file, which is also a known point in the Revit model)
b) WBLOCK that line referencing the 0,0,0 origin.
c) insert/link it into the Revit model, and rotate it to the delta of Project/True north
d) move the line end to the visually identifiable point.
e) PIN IT IN PLACE.
Set the Survey Point:
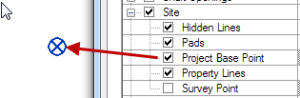
a) In a Level 1 ( 0′-0″) plan view, turn on the visibility of the Survey Point (VG: Site subcategory)
b) UNCLIP (the paperclip symbol) and MOVE the Survey point to the CAD origin end of the reference line
c) Using Manage > Specify Coordinates at a Point, set the Survey Point to 0, 0, 0.
d) RECLIP and PIN the Survey Point (this prevents accidental movement)
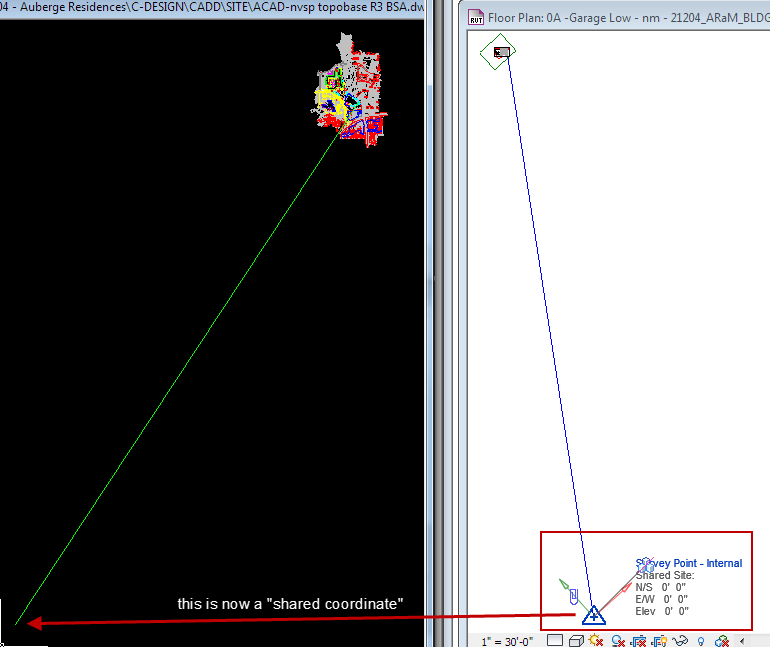
Export a background view to CAD:
a) R > Export > CAD formats > DWG
b) Select the “…” button beside the Select Export Setup, and under the Units & Coordinates tab, select SHARED
c) proceed with export process.
RESULT:
DWG created will have it’s CAD origin set to the 0,0,0 point, AND include the true/project north rotation already applied (this assumes the True North rotation was already set in the Revit file – if not, the export will be to the Revit Project North orientation)
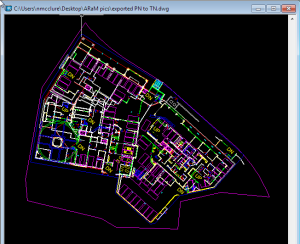
Revit view was Project North —> Exported via Shared Coordinates and result is CAD origin at 0,0,0, with True North rotation applied:

For those who read French, here is a good explanation of BIM – IFC : http://www.rhino4you.com/1/bim_ifc_maquette_3d_383350.html, and what the French call the digital model/sketchup/mockup (maquette numérique).
Pingback: Trackback
Pingback: Trackback